Creating a New Campaign
A guide to setting up your first campaign
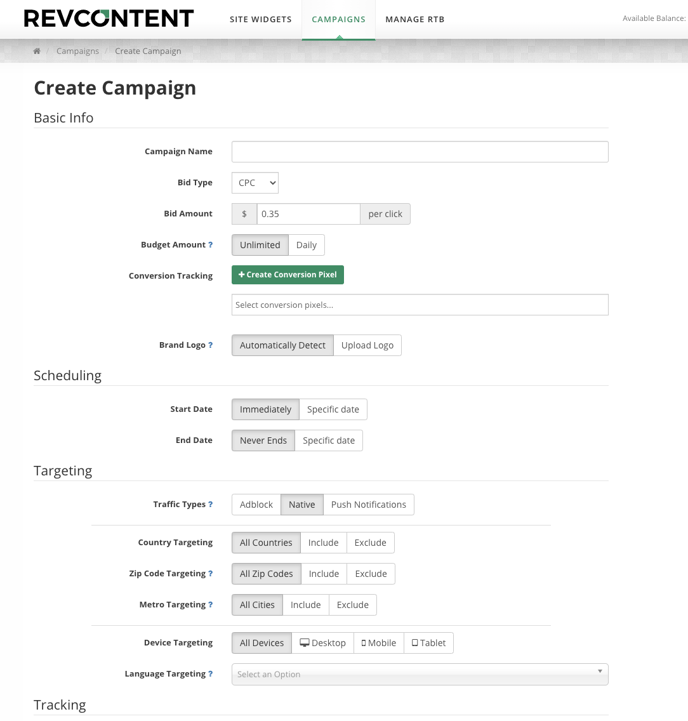
To create your first campaign, start by navigating to your account's "Campaigns" section. You should see the following "Create Campaign" page:

Now let's start filling in each field:
Campaign Name: give your campaign a name. You'll want to use a naming convention that allows you to easily distinguish one campaign from another. Here are 3 examples of recommended formats:
- Country - Vertical - Device - Targeting specific
- US - Skin - Mob - iOS
- Celeb Spouses - US - Desktop
We recommend setting up each campaign to target one device, one country, and one language at a time. Different countries and devices call for different bids, and therefore, breaking these out will allow you to optimize more effectively.
Device Targeting: Allows you to select which device types, operating systems, and browsers your campaign will serve on. It is highly recommended that campaigns targeting desktop devices be run in a separate campaign from mobile devices. The bids needed for each device can vary widely so combining them into one campaign can negatively impact your overall performance.
Bid Type:
- Cost Per Click (CPC) - A pricing model where you are billed per click on your headline/image within RevContent widgets. This model is effective for increasing engagement on your landing page.
- vCPM (Viewable Impressions Per Thousand) - A pricing model where you are billed per thousand views, rather than per click. vCPM campaigns use second-price auction bids. For those unfamiliar with second-price auction bids, this model allows our clients to bid more aggressively while also keeping them from overpaying for a spot. This is done by allowing Advertisers to pay the market value for placement instead of their bid when the market price is lower.
Bid Amount: Your campaign's default bid amount will vary based on your targeting preferences/selections.
Budget: The minimum daily budget for campaigns is $50 per day. When you reach your daily budget your campaign will no longer serve on the network, unless a user clicks or views the content that was served prior to reaching your Daily Budget Amount.
Conversion Tracking: If you'd like to track conversions you can do so by creating a conversion pixel and placing the snippet of code provided within the body tags of the page in which conversion events will be occurring.
Adding New Content to Your Campaign
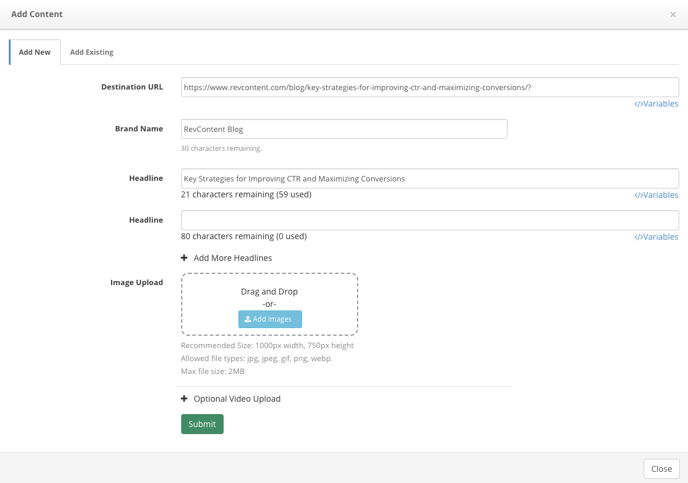
From your campaign's "Manage Content" tab, click on the "+ Content" button to open the "Add Content" modal.
You're now able to input your Destination URL, Brand Name, Headline(s), and Image or Video file(s):

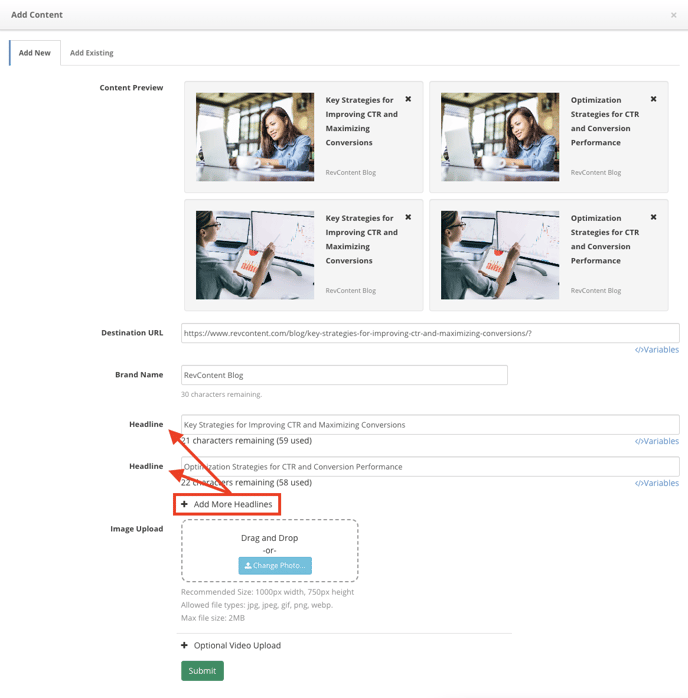
You also have the option of adding multiple headline and/or image variations. To add multiple headlines, simply click on the "+ Add More Headlines" text, and you'll see an additional headline field appear with each click:

We Also offer the ability to add certain variables to your headlines or urls to pull in specific information like city, state, country, etc..
-png.png?width=688&height=271&name=image%20(1)-png.png)
-png.png?width=688&height=446&name=image%20(2)-png.png)
To add multiple images, simply select or drag & drop the additional files into the "Image Upload" section.
When you're finished inputting your content details, click on the green "Submit" button, and your content will automatically be submitted to our policy team for review. Once approved, your content's "Status" will update accordingly, and will then be ready to start serving based on your targeting selections.
